CodeShip part 1: Build & Test

CodeShip is a free service (for Open Source projects) that will link to your GitHub project and build, test, and deploy automatically when you commit. This is similar in function to Jenkins, with the advantage of not having to manage a server and instance. Here is how to get started.

  1. Go to https://codeship.com and choose “Log in with GitHub” to link your account.
  2. Choose to Create a new Project
    • Screen Shot 2015-05-15 at 8.09.20 AM
  3. Connect with GitHub
    • Screen Shot 2015-05-15 at 8.12.37 AM
  4. Find and choose your repository
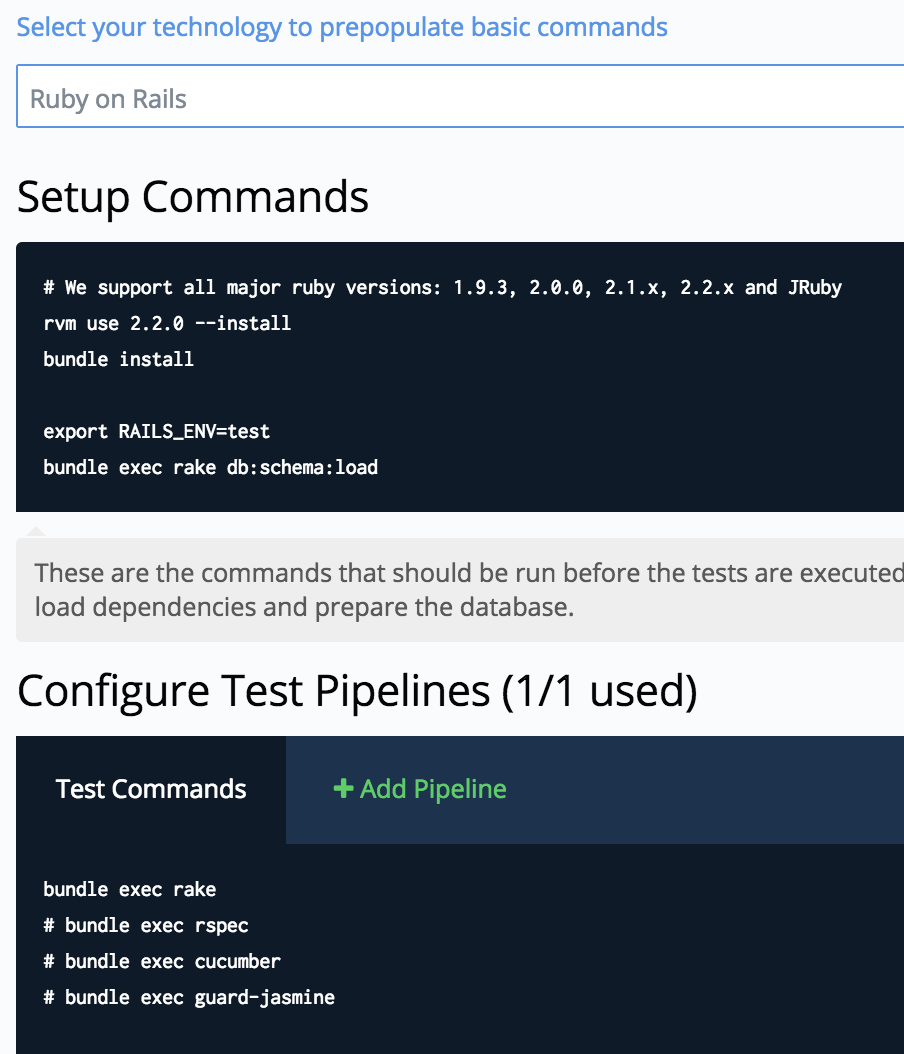
  5. Configure Project, choose the type of project you are building. I chose Ruby on Rails. Notice the Setup and Test commands are populated based on your choice. You can also change these later.
    • Screen Shot 2015-05-15 at 8.15.11 AM
  6. CodeShip now tells you to push to your repository to trigger your first build, so change something, commit, and push to see the build start for the first time.
    • Screen Shot 2015-05-15 at 8.17.28 AM
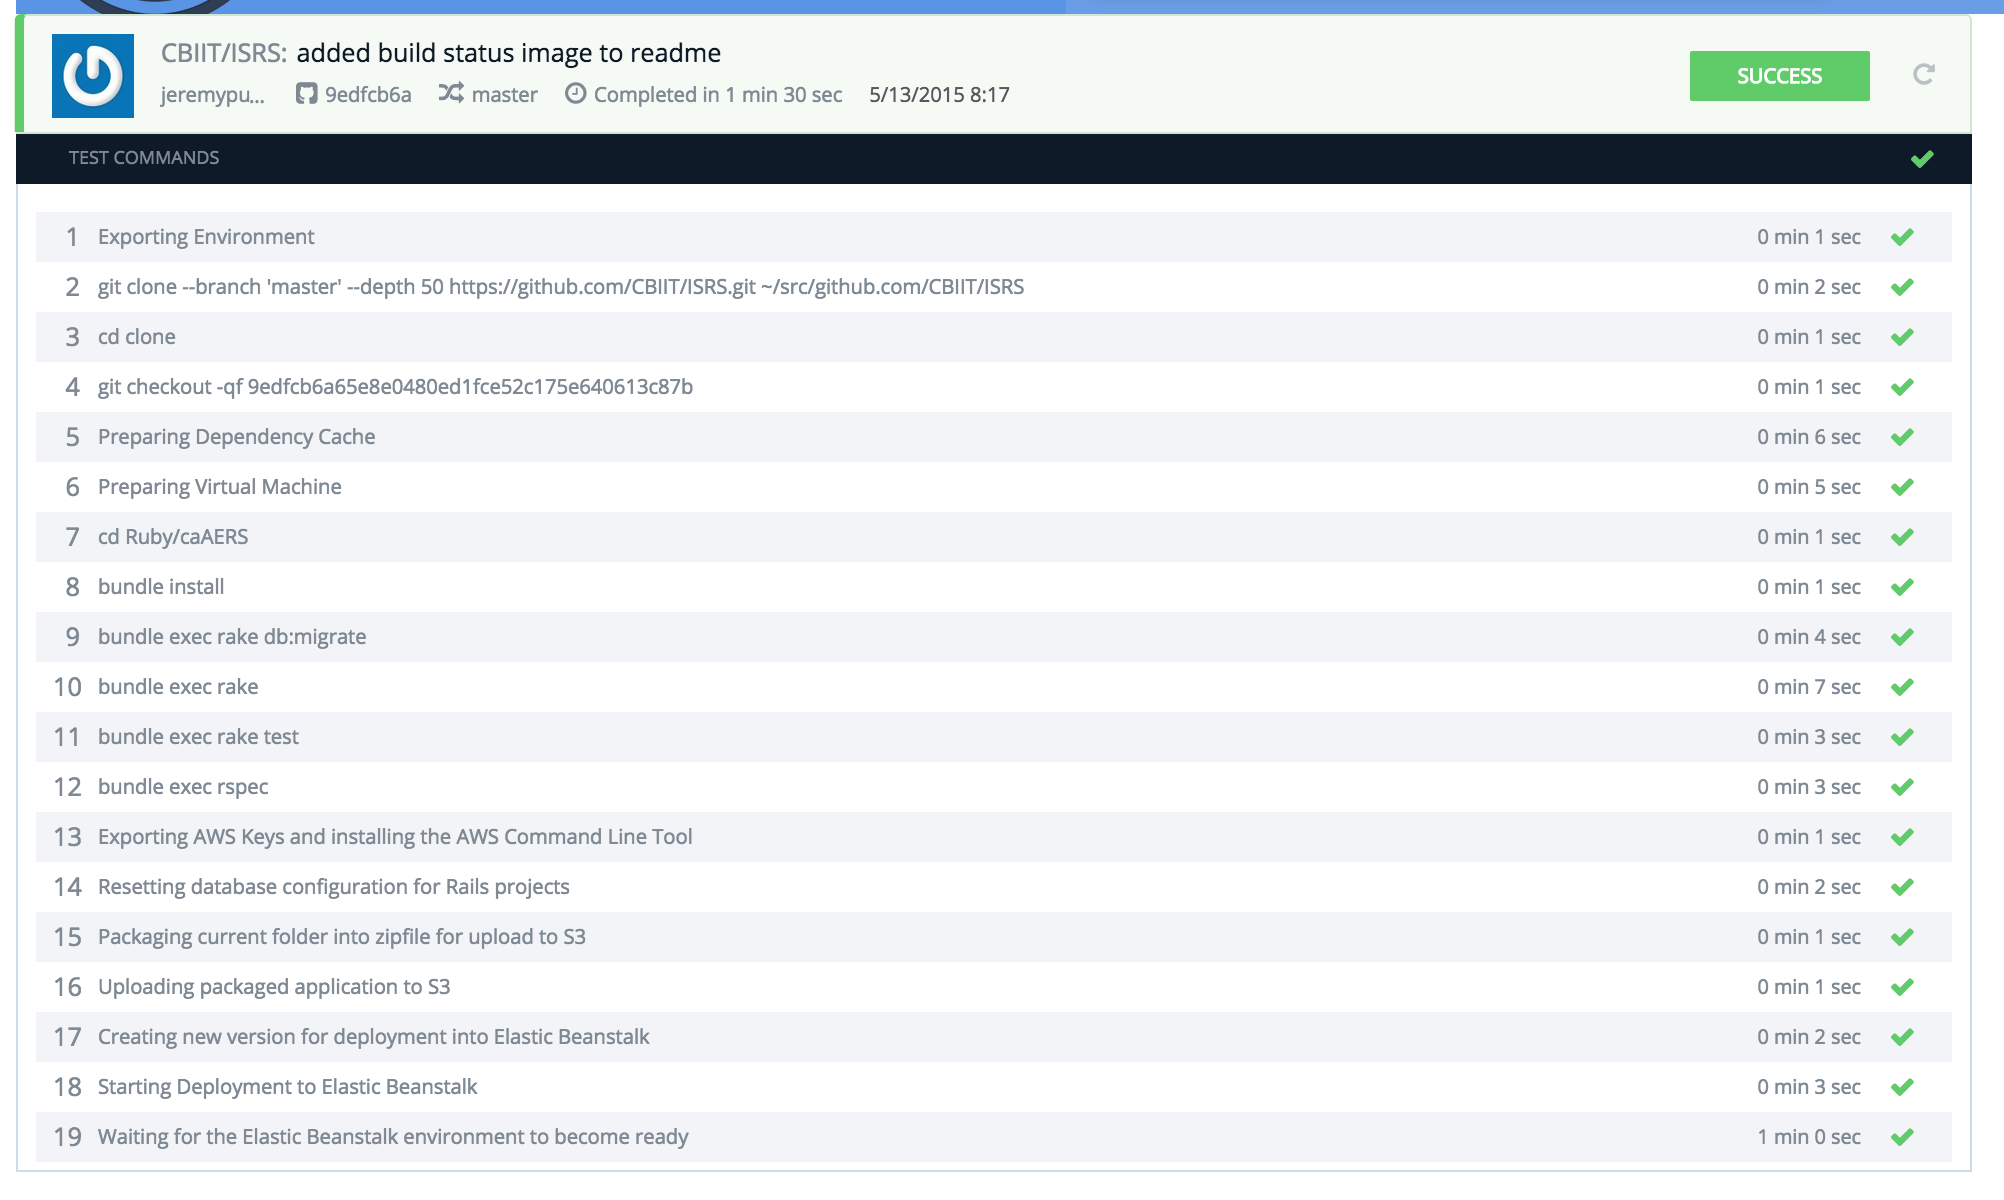
  7. You should see one of these two
    • Screen Shot 2015-05-15 at 8.22.21 AM
    • Screen Shot 2015-05-15 at 8.21.51 AM
  8. If it failed try changing your test settings or code until it passes. For example if your Gemfile is not in the root directory try adding a “cd nextdir/subdir” command to the Test Settings.
    • Screen Shot 2015-05-15 at 8.21.32 AM
  9. Keep working at it until you see something like this
    • Screen Shot 2015-05-15 at 8.27.32 AM
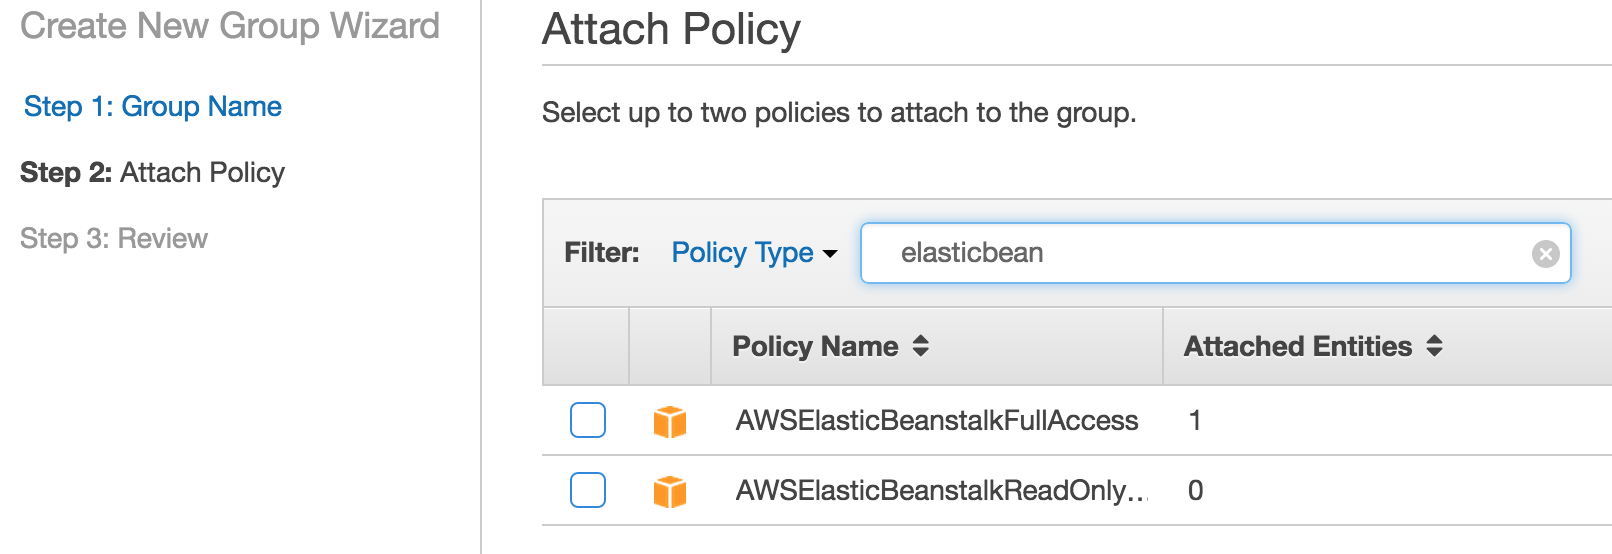
  10. Now that you have build and test working, follow the next blog post to create a cloud CI server to automatically deploy to with CodeShip. CodeShip Part 2

CodeShip Part 2: Deployment, Setting up an AWS Elastic Beanstalk CI/CD instance

Here is what I had to do to set up an Amazon Web Services Elastic Beanstalk instance for use as a Continuous Integration/Delivery deployment box with CodeShip. Continued from CodeShip Part 1

Screen Shot 2015-05-14 at 1.56.46 PM

IAM — Create User

  1. Log Into AWS and go to IAM
  2. Go to Groups, Create New Group
  3. Enter a group name. Since this group was going to have the permissions needed to write to ElasticBeanstalk by CodeShip I called mine “EB-Update”
  4. Attach a Policy. If you type elasticbean in the search you’ll find two that match, choose the one that is not read-only.
    • Screen Shot 2015-05-14 at 2.02.56 PM
  5. Click “Create Group” and you should now have a group with rights that CodeShip needs
    • Screen Shot 2015-05-14 at 1.58.18 PM
  6. Next go to Users, Create New User
  7. I named mine “codeship”, make sure “Generate access key” is checked
    • Screen Shot 2015-05-14 at 2.09.22 PM
  8. Be sure to download those credentials, you’ll need those later
  9. Go back to Users, check beside your user “codeship” and under “User Actions”, choose “Add User to Group”. Choose the EB-Update group created previously.
  10. You now have a User that is a member of a Group, that has the appropriate Policy to do updates to your yet to be created Elastic Beanstalk instance.

Screen Shot 2015-05-14 at 2.36.07 PM

EC2 — create Key Pair

  1. Go to EC2, Key Pairs, Create Key Pair
  2. Choose a name, I named mine aws_isrs
  3. It creates and then downloads a .pem file which you should copy to your .ssh directory if you want to be able to ssh into the server you create later.

Screen Shot 2015-05-14 at 2.16.31 PM

Elastic Beanstalk — Create dynamic EC2 instance

  1. Rather than creating a traditional EC2 instance we’re going to use Elastic Beanstalk to do it for us.
  2. Go to Elastic Beanstalk, “Create New Application”
  3. Name your application. This should reflect the service you’ll be pushing to this, so I named mine the same as my GitHub project.
  4. For my Ruby Rails project I choose to create a Web Server Environment.
  5. Choose a Permission Profile. I chose the default with plan to update it later.
    • Screen Shot 2015-05-14 at 2.24.26 PM
  6. Choose an Environment Type. I chose Ruby, and since it was just a CI/CD layer I chose a Single Instance over a Load Balancing/Auto Scaling one.
    • Screen Shot 2015-05-14 at 2.26.03 PM
  7. Application Version, to load the environment the first time it wants a zip of your project.
    1. Jump over to GitHub for your project and choose “Download Zip” in the bottom right.
      • Screen Shot 2015-05-14 at 2.28.23 PM
    2. Then back in AWS choose “Upload your own” and select the zip file you just downloaded
  8. For Environment Info choose a name for the purpose and tier, for example I choose “isrs-ci” for mine.
  9. I didn’t choose any Additional Resources
  10. Configuration Details, enter your contact email, and choose the Key Pair you created above.
    • Screen Shot 2015-05-14 at 2.41.41 PM
  11. Enter environment tags if you find them helpful. I added Tier=Integration & Use=ISRS_caAERS for my project
  12. Review and click Launch. Wait for it to finish loading.

Screen Shot 2015-05-14 at 2.51.09 PM

CodeShip — Set Up CD

  1. Go to your project in CodeShip and select “Set up Continuous Deployment”
    • Screen Shot 2015-05-14 at 2.52.51 PM
  2. Add a Deployment to your Pipeline and choose “Amazon Elastic Beanstalk”
  3. Enter in the information gathered during the previous steps
    1. AWS Access Key ID: From the excel file downloaded after creating the “codeship” user.
    2. AWS Secret Access Key: From same file
    3. Region: From AWS, EC2, instances, Availability Zone
    4. Application name: From AWS, Elastic Beanstalk Application name, mine was ISRS
    5. Environment name: From AWS, Elastic Beanstalk Environment name, mine was isrs-ci
    6. S3 Bucket: From AWS, S3,
    7. Screen Shot 2015-05-14 at 2.55.31 PM
  4. Either wait for you next push or click reload. At this point when something is pushed to GitHub you should have an automatic build, test, and deploy to this CI environment!

Integrating CodeClimate with a GitHub project

CodeClimate describes itself this way, “We run static and automated analysis on your Ruby on Rails, JavaScript, PHP (beta), or Python (beta) codebase, and then present you with easy-to-read, actionable findings.”

Using CodeClimate to get a feel for your code quality and areas to improve is a good idea, and very easy to integrate with an existing GitHub repo. Here’s what I did for my Ruby Rails project.

  1. Go to https://codeclimate.com and click “Sign Up with GitHub” at the top.
    • Sign Up with GitHub
  2. It will ask you to confirm that you want to allow communication between CodeClimate and your GitHub repo.
  3. From the CodeClimate Dashboard (https://codeclimate.com/dashboard) click on “Add Open Source Repo”. You can also add private repositories, but that requires a paid account with CodeClimate.
    • Add Repo
  4. Enter the name of your repository
    • Add GitHub Repo
  5. CodeClimate will analyze the project end email you when it is ready to be viewed.

You can also easily integrate test coverage:

.ppk to .pem, Using a putty key for ssh on Mac/Linux

Recently when trying to access a new Amazon server from my Mac, I was given a .ppk by a well meaning Windows/putty user. Using the typical “ssh -i key.ppk root@boxname” didn’t throw any errors, but did ask for a password, which I knew shouldn’t be expected with a key. A little searching found these easy steps to covert the .ppk file to a .pem that ssh can use correctly.

  1. Install Homebrew if you haven’t already
    1. ruby -e "$(curl -fsSL https://raw.githubusercontent.com/Homebrew/install/master/install)"
  2. Install putty on your Mac
    1. brew install putty
  3. Convert the .ppk to a .pem, where key.* is your key file name.
    1. puttygen key.ppk -O private-openssh -o key.pem
  4. Set the permissions on the new file
    1. chmod 600 key.pem
  5. ssh with the converted .pem key
    1. ssh -i key.pem root@boxname